Homemade Candied Walnuts: An Effortless Path to Gourmet Gifting
There’s a certain magic in transforming simple pantry staples into something truly extraordinary. Few recipes capture this enchantment as perfectly as
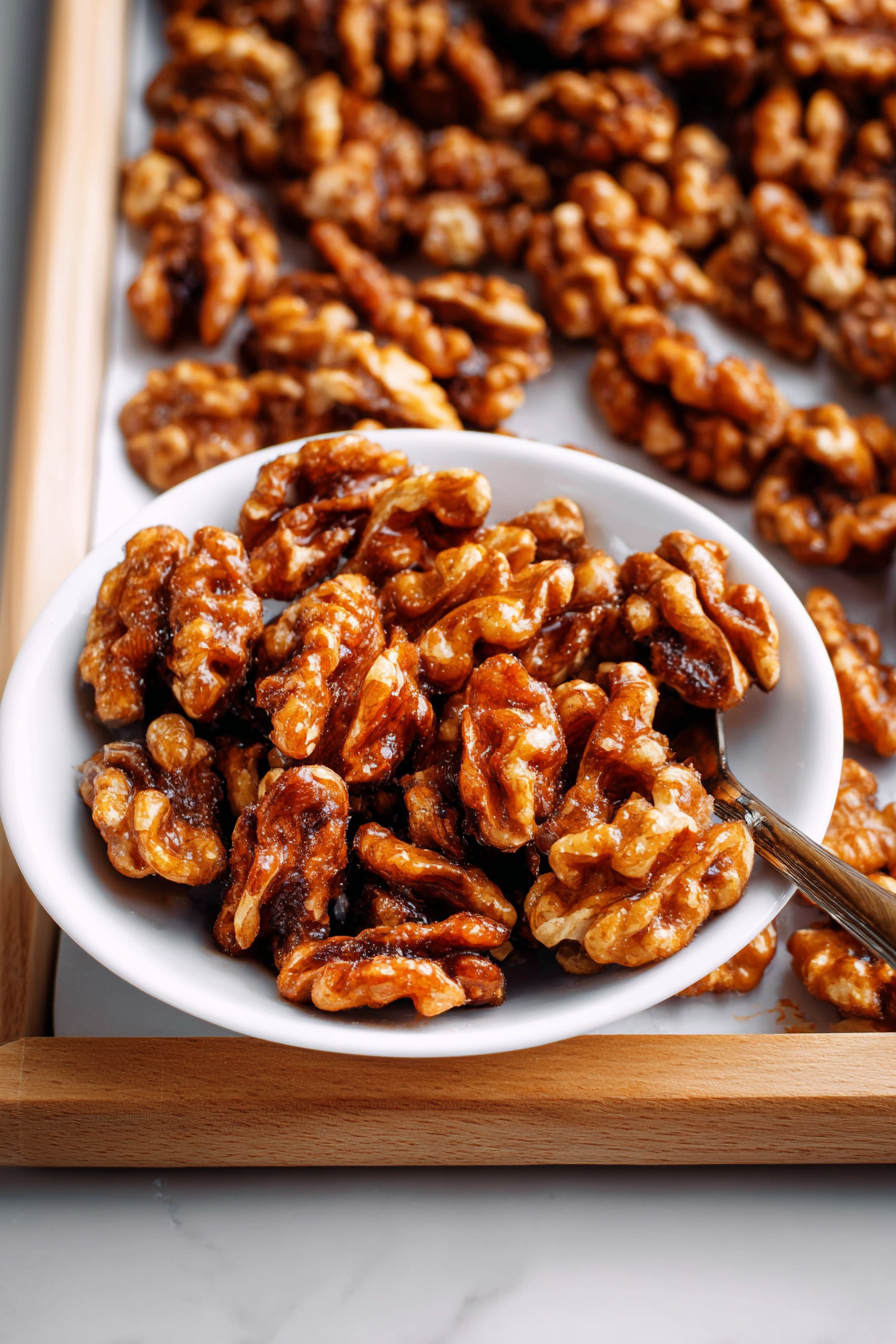
homemade candied walnuts. Imagine buttery caramelized sugar clinging to perfectly toasted walnuts, creating an irresistible crunch and a burst of sweet, nutty flavor. Whether you're aiming to elevate a weeknight meal, prepare a delightful snack, or craft thoughtful, budget-friendly gifts, these elegant treats are a revelation. What might seem like a gourmet indulgence is, in reality, incredibly simple to achieve, requiring minimal ingredients and even less time.
Why Homemade Candied Walnuts Are a Must-Try
The allure of making your own candied walnuts extends far beyond their delicious taste. It's about the sheer convenience, versatility, and the impressive results you can achieve with so little effort.
-
Quick & Effortless: In our fast-paced lives, recipes that deliver maximum impact with minimal fuss are golden. This recipe is a shining example. Many variations boast a "5-minute" cook time, allowing you to whip up a batch during a short break. This stovetop method offers unparalleled speed and control, making it ideal for those spontaneous cravings or last-minute needs. To dive deeper into the speed aspect, check out our guide on Quick & Easy: Make Gourmet Candied Walnuts in Just 5 Minutes.
-
Minimal Ingredients, Maximum Flavor: The beauty of these sweet walnuts lies in their elegant simplicity. You'll typically only need three core ingredients: walnuts, granulated sugar, and unsalted butter. This trifecta proves that gourmet doesn't have to mean complex or expensive. Chances are, you already have these staples in your kitchen, meaning you're always just minutes away from a delightful treat.
-
Incredibly Versatile: Candied walnuts are culinary chameleons, capable of transforming a variety of dishes. Sprinkle them over a fresh spinach or apple salad for an instant restaurant-quality upgrade. Fold them into plain yogurt or oatmeal for a luxurious breakfast. Arrange them on a cheese board to add professional flair and a delightful textural contrast. They’re equally sublime enjoyed by the handful as a sweet, crunchy snack. Discover more ways to use them in Elevate Meals: How Candied Walnuts Transform Salads & Snacks.
-
Perfect for Gifting: The phrase "homemade gifts" often conjures images of hours spent in the kitchen. Not so with candied walnuts! These delectable nuts look sophisticated and taste expensive, yet their cost is surprisingly modest. Packaged elegantly in mason jars, cellophane bags, or small decorative boxes, they make exceptional hostess gifts, teacher appreciation presents, holiday treats, or thoughtful tokens for any occasion. The personal touch of a handmade gift, especially one this delicious, is always deeply appreciated.
The Simple Secret: Ingredients and Stovetop Technique
The magic of truly exceptional candied walnuts doesn't come from exotic spices or elaborate processes, but from a straightforward technique and a few quality ingredients.
Ingredient Highlights:
-
Walnuts: The star of the show! While walnut pieces work perfectly fine and are often more economical, using walnut halves often offers a more beautiful presentation and a larger surface area for that delicious sugary coating. When selecting walnuts, aim for ones that smell fresh and aren't overly dark, as older nuts can sometimes taste bitter. Consider a quick dry toast in a pan beforehand for an even deeper, nuttier flavor, though it's not strictly necessary for this recipe's success.
-
Granulated Sugar: This is the backbone of your candied coating. As it melts and caramelizes, it forms the sweet, crunchy shell around each walnut. The key is to keep it moving to prevent burning and ensure even distribution.
-
Unsalted Butter: More than just adding richness, butter plays a crucial role in the coating process. It helps the sugar adhere smoothly to the walnuts, prevents sticking, and contributes to that desirable glossy finish that makes these nuts so appealing. Using unsalted butter gives you control over the overall sodium content, allowing you to add a pinch of sea salt later if desired.
The Stovetop Method: A Masterclass in Control and Speed
While oven-roasted candied nuts have their place, the stovetop method truly shines for its speed, simplicity, and the real-time control it offers. The "secret" technique involves cooking all three ingredients in one pan over medium heat, stirring constantly.
As the sugar melts, it will combine with the butter, creating a luscious, golden syrup. Continued stirring ensures that each walnut is thoroughly coated before the sugar begins to crystallize and adhere. You'll watch the transformation happen right before your eyes – from loose sugar to a sticky glaze, and finally to a beautiful, crispy candied coating. This hands-on approach allows you to achieve that perfect golden color and caramelized texture, signaling they’re done just right, avoiding any risk of over-browning that can sometimes occur in an oven.
Beyond the Basics: Elevating Your Candied Walnuts
While the classic three-ingredient recipe is a masterpiece in itself, it also serves as a fantastic blank canvas for culinary creativity.
Customization Ideas:
-
Spice It Up: For autumnal or holiday vibes, add a pinch of ground cinnamon, nutmeg, or pumpkin pie spice during the cooking process. These warm spices pair wonderfully with walnuts.
-
A Touch of Savory: A tiny pinch of sea salt sprinkled over the freshly cooked nuts can dramatically enhance their flavor, cutting through the sweetness and adding a sophisticated edge. For those who enjoy a kick, a dash of cayenne pepper introduces a delightful sweet-and-spicy contrast.
-
Extracts for Aroma: A few drops of vanilla extract, almond extract, or even rum extract added at the very end (after removing from heat but before cooling) can infuse your walnuts with an extra layer of fragrant complexity.
-
Switch the Nut: While this article focuses on walnuts, this method works beautifully with other nuts like pecans, almonds, or even cashews.
Serving Suggestions for Every Occasion:
*
Salads: Beyond the classic spinach, try them with mixed greens, goat cheese, cranberries, and a balsamic vinaigrette, or with an apple and celery salad.
*
Breakfast & Brunch: Stir them into yogurt parfaits with berries, sprinkle over oatmeal, or use as a crunchy topping for pancakes and waffles.
*
Cheese Boards: They provide a fantastic sweet and crunchy counterpoint to soft cheeses like brie, goat cheese, or blue cheese, as well as harder aged cheddars.
*
Desserts: Garnish ice cream sundaes, sprinkle over fruit crisps, or crush them slightly to add to cookie dough or cake batter for textural intrigue.
Gifting & Presentation Tips:
When packaging your candied walnuts as gifts, presentation makes all the difference. Simple glass jars tied with a ribbon and a handwritten tag are always elegant. Small cellophane bags, perhaps nestled in a decorative box with tissue paper, also work wonderfully. Remember to let the walnuts cool completely and harden before packaging to prevent them from sticking together. A small silica gel packet (food-safe, of course) tucked into a larger gift jar can help maintain crispness if gifting far in advance.
Troubleshooting and Best Practices for Perfect Candied Walnuts
Even with a simple recipe, a few tips can ensure your candied walnuts turn out perfect every time.
-
Don't Rush the Heat: While the process is quick, start with medium heat. Too high, and the sugar can burn before it has a chance to properly coat the walnuts.
-
Stir, Stir, Stir: Consistent stirring is crucial. It ensures even coating, prevents sugar from clumping in one spot, and helps distribute the heat to prevent burning.
-
The "Doneness" Test: The sugar will first melt into a clear syrup, then turn amber, and finally begin to thicken and crystallize around the walnuts. Once they're evenly coated and have a nice golden hue, they're ready. Don't wait too long, as they will continue to cook slightly from residual heat.
-
Cooling is Key: Immediately after cooking, spread the candied walnuts in a single layer on parchment paper or a silicone baking mat. Do not pile them up, as they will stick together. Allow them to cool completely and harden. As they cool, they will become wonderfully crisp.
-
Storage: Once completely cooled, store your candied walnuts in an airtight container at room temperature. They will remain fresh and crispy for up to two weeks, though they rarely last that long! For longer storage, you can refrigerate them.
Conclusion
Homemade candied walnuts are more than just a recipe; they're an invitation to create, share, and delight. With their minimal ingredients, effortless preparation, and incredible versatility, they prove that gourmet flavors don't have to come with a gourmet effort. From a simple snack to an elegant gift, these sweet walnuts consistently deliver on taste and charm. So, clear your counter, grab those three ingredients, and prepare to embark on a culinary journey that promises impressive results in just minutes. Your taste buds, and anyone lucky enough to receive them, will thank you.